Quantcast
Channel: ALL HACKING TRICKS
Viewing all 25 articles
Browse latest View live

How to Flash Kali NetHunter on OnePlus and Nexus Devices (Most) As a Secondary ROM

$
0
0
Hello there, 'Flashers'!
Welcome to my 7th Post. This tutorial will explain how to flash Kali NetHunter on OnePlus (Tested) and Nexus Devices (Not Tested-Should work) as a secondary ROM, so that none of your personnel data/ROM gets affected.

NetHunter?

Refer to Ciuffy's Post, right here

Pre-Requisites:

1) Device should be rooted
2) Should have TWRP custom Recovery Installed/Flashed.
3) (Bootloader, should be unlocked, if locked)
4) A Back Up if anything goes wrong. (Make it using the recovery)
For OnePlus here is a guide on all of this from XDA.

Step 1: Installing MultiROM :

Install MultiROM manager from Google Playstore
1) After installing, Open it.
2) Tick all the Check-boxes
3) In the last one choose the correct Kernel (Kitkat or Lollipop)
(WARNING: Check the Kernel Status: It should be in Green Letters, but if inRED then, ask about it in the comments section)
4) Tap Install
5) This will do everything for you, sit back and relax, it will take time.
6) After everything goes right, you should have:
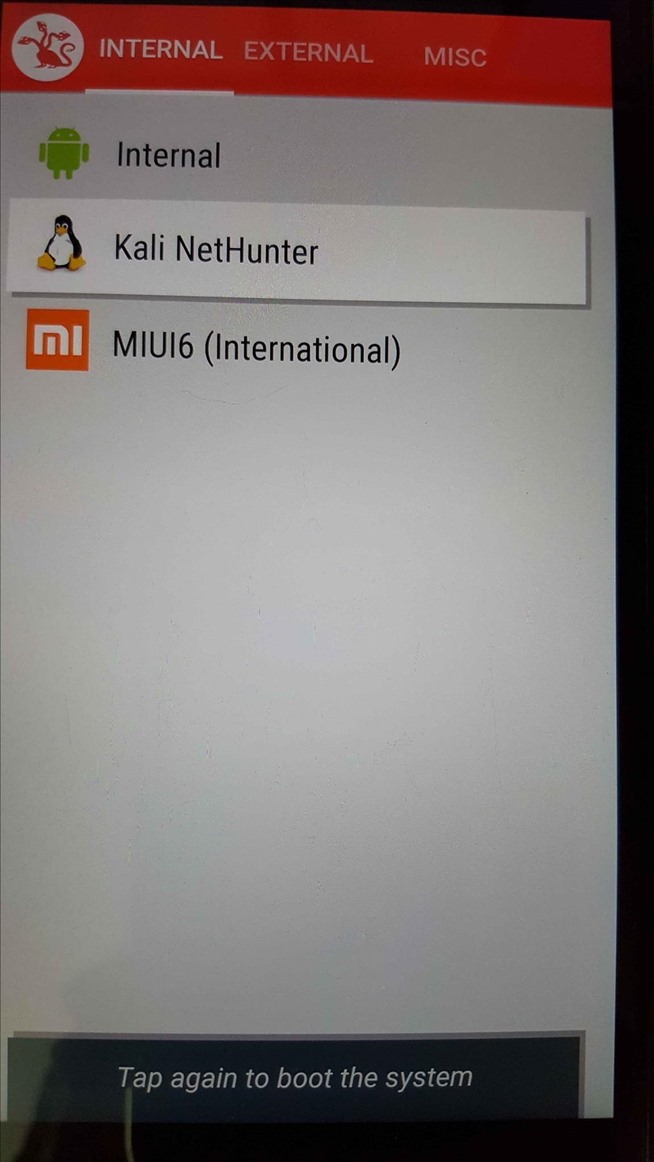
  • A modified custom recovery,
  • A boot manager at start-up that asks, which ROM to boot into. (Press cancel so it won't automatically boot into the Internal ROM)
  • The same application, in the internal ROM, which manages every ROM, and Check for Updates.

Step 2: Downloading CM11-M11 ROM:

We will be using this because it is highly compatible with MultiROM.
Goto this website, and Download CM11 M11 ROM for OnePlus.
Click here for WiFi Model Nexus 2013
Click here for 4G/LTE Model Nexus 2013
Click here for LG Nexus 5
Click here for Nexus 4
Go to your default search engine (Google) and search this ROM for your Device if not listed here.

Step 3: Downloading Kali NetHunter

Go to the Official website of Kali 
Scroll down to the bottom and download the correct image (actually .zip) for your Device.
Don't use the Windows Installer.

Step 4: Downloading SuperSU.Zip and BusyBox:

Download this Super User update.
Also, Download BusyBox from Playstore or from here

Step 5: FLASHING CM11-M11 as a Secondary ROM:

After all of your Weapons are ready, it's time to FIRE. (I mean Flash)
Move all the items to the root of your SD-card in your Device (or any other Folder)
  • Reboot your system to Custom Recovery. (Vol-Down + Power, when device is turned off)
  • Once booted, go to Advanced, then MultiROM settings, tap on add ROM
  • Tap on Next. (Or choose where do you want to install the ROM Eg: A Flash/Pen Drive)
  • Choose ZIP file
  • Choose cm-11-20141008-SNAPSHOT-M11-xxxx.zip (The ROM you just Downloaded)
  • Swipe to Confirm
  • Once Finished, Reboot system.
------------------------------------------------Flashed--------------------------------------------
  • Use the MultiROM manager at Start-up to boot into The Flashed ROM.
  • Go out there and explore!
  • Install BusyBox, open it and then Install it. (It may/will fail because the system is not rooted) (Don't worry its temporary, you may even skip this step)
  • Once you are happy, and want to move on, Follow the next step.

Step 6: FLASH KALI NET-HUNTER!!!

  • Reboot to Recovery.
  • Go to MultiROM settings.
  • Tap on 'List ROMs'
  • Choose the CM11-M11 ROM
  • Tap the small button stating 'Flash ZIP'
  • Choose The Kali Nethunter.zip you just downloaded.
  • Swipe to Confirm Flash
  • After flashing, Reboot system.
-----------------------------------------FLASHED-------------------------------------------------
  • Congratulations you Successfully Flashed Kali NetHunter!!
  • Boot into the ROM
  • EXPLORE! Go Go Go!
  • Sort things out, install necessary apps, play-store, Google services etc..
  • Tap on KaliNetHunter Home (App) and Explore it too!
  • However any service provided by it won't WORK, because the ROM is not Rooted.
  • Then what are we waiting for? Let's gain the root access.

Step 7: Rooting the ROM:

It's too easy! (Now that you have practice)
  • Reboot to Custom/TWRP Recovery.
  • Go to MultiROM settings.
  • Then to 'List ROM'.
  • Choose the same ROM
  • Then to 'Flash ZIP'.
  • Choose The SuperSU.zip that you downloaded.
  • Swipe to Confirm Flash.
  • After the Flash Reboot System.
--------------------------------------------FLASHED/ROOTED--------------------------------

The FUN Begins:

And now rename the ROM if you want to, using the manager in Internal ROM.
Boot into NetHunter.
So you are good to Go!
Every service offered by NetHunter can be accessed!
Also download SuperSU.apk from the playstore and Install BusyBox again.
ENJOY! EXPLOIT! HAVE FUN!

The Tutorial ENDS:

When following this tutorial, I hope you could learn something from it (me too) about Flashing and Roots. And now, I think you can Flash any ROMs that you need.
{When you are in the boot manager, at start-up, tap the top-left icon, of the MultiROM manager, see what happens (a little game! lol)}
Good Luck!
There is an issue with OnePlus I think, Sometimes, it may get suck into a boot-loop but that's Fine, just press the key combination for custom recovery until the device turns-off. Then release the buttons and press them again, once you get booted to custom recovery, reboot system from there.

How to Install the Xposed Framework on Your Nexus 7 for Insane Customization

$
0
0
Customization of our Android devices, outside of what Google and mobile carriers allow us to do, used to mandate that our devices were rooted and running a custom ROM.
While rooting is fairly easy for the Nexus 7, many people don't like the idea of writing over their core system with a custom ROM. From non-working features to backing and wiping data, flashing a custom ROM isn't all it's cracked up to be.
A cozy middle ground was developed by Recognized Developer rovo89 when he created Xposed Framework.
Xposed is an application that allows customization of almost all aspects of your system, including many things that previously were only available by flashing custom ROMs. From securing our devices from prying eyes, to applying icon themes, to having the ability to save Instagram photos, this is a highly efficient tool for modding our Nexus 7 tablets.

Getting Started

Before I walk you through the install process, let's get a couple of prerequisites out of the way.
First, you'll need to be rooted. Check out our softModder guides on rooting your Nexus 7 for Windows and Mac.
Secondly, you'll need to have "Unknown sources" checked. To do that, simply go to Settings -> Security and check it off.
Image via wonderhowto.com

Step 1: Get the Xposed Installer

Grab the latest version of Xposed Framework from here. The easiest way is to download the file directly to your Nexus 7.
From there, go ahead and tap on the downloaded file from your Notification tray, and it'll install like any other app.

Step 2: Update Xposed & Reboot

Now, open the Xposed Installer app and select "Framework."
From here, select the "Install/Update" option. This ensures that you are always on the latest version, so check this option regularly.
After you've updated, reboot your device. A reboot will be needed whenever you update or install a "module" (what the various hacks are referred as).

Step 3: Install Modules

Now, from the main menu, select the "Download" option. Here, you'll see the various modules that are available directly in the app, and the list is always growing. To see some of them in action.
Be aware that not all modules will work for all devices. Make sure to read through the descriptions prior to installing, and check out their support forums for additional information.
That's it! Let us know if you find any cool modules, or any that you'd be interested in seeing a how-to on. And as always, feel free to post your comments and questions below, or over in the Nexus 7 softModder forum.

How to Make Money on Android: 15 Apps That Give Rewards & Cash Back for Doing Almost Nothing

$
0
0
With the amount of time we spend glued to our smartphones, they could be considered a second job (if only we got paid). I spend a large part of my day scrolling through Reddit, Facebook, Instagram, and countless other apps, and burn through hours and hours without even noticing.
While it's great finding out what my friends did over the weekend, I don't really have anything to show for it at the end of the day, so I set out to find some apps that could keep me entertained and make me some money.
The apps I discovered aren't going to make you millionaires over night, but they can make splurging on a night out a little easier. So if you find yourself needing a few extra bucks, or just want to finally start adding to your savings account, check out my top money making apps for Android below.
None of the apps require you to have any special skill set or equipment, so whether you're a couch potato or are looking to get out of the house more, you'll find an app that fits your needs. You should also keep in mind that these apps do not simply send you a check at the end of every month, but instead let you redeem your rewards through PayPal, via gift cards, or other similar means.

Complete Surveys for Extra Moola

There are quite a few survey-based apps that reward you for completing online surveys.

1. Google Option Rewards

First up is Google Opinion Rewards, which will periodically send you surveys based on the demographic you fall into.
The surveys don't pay out boatloads of money, but over time they can add up to some pretty decent amounts. Another thing to keep in mind with this app is that the payments are distributed as Google Play credits instead of actual money, which you can use for apps, music, movies, books, magazine, and more.

2. Surveys on the Go

Surveys On The Go is very similar to Google Play Rewards, but instead of getting paid in Google Play credits, you can actually receive your payout through PayPal, which can be transferred to your personal bank account. There is also the option to enter a Survey Code, which are special codes given out by companies that use Surveys On The Go to collect research data.

3 + 4. Swagbucks & InboxDollars

In addition to offering surveys, Swagbucks and InboxDollars also come bundled with other ways to make money. By using the built-in browser to check emails, download apps, and search the web, InboxDollars can earn you some additional money. Swagbucks does not have any of those extra features, but does comes with an ad viewer that rewards you for not skipping through ads.

View Advertisements to Earn Cash

If you don't mind watching ads for hours on end, there are more than a couple of good options for you.

5 + 6. Swagbucks TV Mobile & AppTrailers

You can use something like Swagbucks TV Mobile or AppTrailers. Both apps reward you for watching trailers for apps, movies, TV shows, and games. And Swagbucks TV Mobile ties into your Swagbucks account, so you can earn points through both apps at the same time.

7. Slidejoy

For those that would rather not deal with watching full-length ads, you can turn your lock screen into an interactive billboard with Slidejoy. Slidejoy replaces your lock screen background with ads that earn you money, even if you are simply unlocking your device, which means you don't have to launch any of the ads in order to start stacking up a few extra cents here and there.

Perform Easy Tasks (Some Work Involved)

This next category is for those of you who do not mind getting off the couch to earn a little scratch.

8 + 9. Mobee & Rewardable

With apps like Mobee and Rewardable, you act as a secret shopper and are sent to stores around your area to check stock, snap pictures of ads, and other small tasks that companies rely on to make sure their products are being displayed properly.

10 + 11. EasyShift & Field Agent

If neither of those two apps give you enough to keep you busy, you should check out EasyShift and Field Agent.
EasyShift will require you to fill out surveys and take pictures at specific locations, with each 'shift' requiring only a few minutes to complete.Field Agent will pay you to collect information like photos or product information from locations or your home.

12. Pact

While Pact doesn't really reward you for completing tasks for other people, it does pay you for doing things for yourself. When you sign up for Pact, you agree to put money on the line to keep your healthy eating and fitness goals intact.
Each goal is held for a week and are verified through pictures that you take through the app. You can also verify the pictures of other users to make sure they are keeping their pacts as well. Keep in mind that if you do not keep your pact, you get penalized by having money taken from your account, so be sure to only commit to goals you know you can keep.

13. Foap

Lastly, we have Foap, which is an app that allows you to sell all the pictures you've accumulated over the years. This doesn't mean you should upload all those selfies you take, but if you have some scenic shots of the beach or other hotspots around your city, they can earn you a few extra dollars. You also get to set the price of the pictures, so to be competitive, you should browse other users' photos for price ranges.

Add Up Your Receipts for Cash Back

If you're already buying groceries and other must-have products every week, why not scan you receipts in afterward or add rebate coupons for certain items you know you're getting before you even go to the store.

14. Ibotta

Ibotta isn't an app that earns you money directly, but can scan your receipts to find you rebates that you didn't even know you qualified for. You can also use the app to create shoppings lists that already have rebates attached to them, so that you know for sure that your next grocery store visit will net you some extra savings.
To unlock the rebate offers, you may be required to first answer a few survey questions, but none of them should take you more than a couple seconds to complete.

15. Receipt Hog

Receipt Hog, on the other hand, doesn't earn you rebates, but it does scan your receipts to give you coins based off the contents of it. The coin value is different depending on where you shop, but once you save up enough, you can redeem them for gift cards or a PayPal deposit. There are also extra ways to earn coins, like spinning a slot machine and sharing the service with friends.
Again, these apps probably won't get you anywhere close to buying that new Lamborghini, but they can definitely help your beer fund. Be sure to drop me a comment below if you know of any other ways to make a quick buck on your phone!

Turn Your Smartphone Pics into Extra Cash with These Android and iPhone Apps

$
0
0
Everything is documented these days, thanks to the Internet and mobile devices. Most people who own a smartphone use it to take lots of pictures. If you're one of those people, an app called Scoopshot can help you turn some of those photos into extra cash.
Scoopshots lets you post your pics so that news organizations can pay you to use them. Companies can also post tasks, so if someone is looking for a particular photo in your area, you can accept the task, go take the photo, and earn money for it if yours is chosen.
When you upload a photo, you set the price and location and add a description, then list it for sale. You can even import pictures taken with other camera apps. Your photos can be published by multiple organizations unless someone pays extra for exclusive rights, and you can even ask to be credited by name if you want.
All in all, this is a pretty win-win situation. You get paid for taking photos you probably would have taken anyway, and it's free, so if no one buys a photo, you aren't out of anything. And if you're lucky, you can even make a ton of money with this, like this chap who earned nearly $20,000 already.
Check out the video to find out more about Scoopshot.
Scoopshot is available to download for iOS and Android devices.
Not into Scoopshot? There's also Foap, another mobile app for phoneographers, only there's just an iOS app right now, though an Android one is in the works. Also, they only accept higher quality images and each image sells at a set price of $10, of which you get half.

How to Get Unlimited Free Trials Using a "Real" Fake Credit Card Number

$
0
0
In most cases, when the free trial of software is over, that's it—you're left to either pay for it or find an alternative. But what happens if the trial wasn't long enough to sell you on the product? It'd be nice if there was a way to test it out again without having to whip out your credit card.
As it turns out, getting another free trial could be as easy as removing a few files or changing your computer's MAC address. In this guide, I'll be showing you two methods, on both Mac and Windows, that you can use to test out software for as long as you need on your computer. And as a bonus, I'll show you that these techniques can be used to break the time-restraints on free, public Wi-Fi networks.

Method 1: Delete Files Left Behind by Uninstalled Apps

Some trial software store activation information in the form of files on your hard drive, which allows app installers to determine if that product had been previously installed on that same drive. This is why you're unable to reinstall trials over and over again.
This method will show you how to identify these hidden files and delete them from your computer so that you can reinstall a trial version.
Note that this method will only work for software that verifies trial status using registry keys.

Deleting Files from Your Registry on Windows

Begin by uninstalling the trial software through the Programs and Features window—click on the software you want to get rid of, hit "Uninstall," and confirm it in the pop-up window.
To get rid of the files associated with that program, it's time to head to the registry. Open Run (WIN + R), type in "regedit," and hit Enter to open the Registry Editor.
Important: You should absolutely create a backup copy of your registry in case anything goes wrong. Do this by choosing the "Export" option under File. If you ever need to restore this, simply choose the "Import" option.
Inside of the Registry Editor, click on File, then Find (or alternatively, pressCtrl + F). Enter the name of the software you uninstalled in the text box and click on "Find Next."
Once the associated files are populated, all you have to do is select the files and hit Delete, then reinstall the software and enjoy your new trial period.

Getting Rid of Associated Files in Your Library on Mac

You can get rid of files associated with software in just a few clicks. Using apps such as AppTrap and AppCleaner, you can drag the trial software icon to the Trash and all of the files hidden away in your Library (where they're kept on OS X) will be deleted as well.
You can also go into your Library and find the files manually, although that takes a little more work. You can find all of the options to get rid of these files either using this guide or by watching the video below. Whatever option you use, you'll be able to install the trial software like new.

Method #2: Change MAC Address

Some services offer trial subscriptions through the cloud, so they may use your MAC address (a unique fingerprint to your computer) to monitor when your trial is over.
So naturally, the trick here is to change your MAC address, making it so your computer isn't recognized when you reinstall the program.
Important: Make sure that you disconnect from any Wi-Fi networks before changing your MAC address on both Windows and Mac. Changing your MAC address while connected to a Wi-Fi network can mess up your connection, so you'll need to restart your router and your computer to fix any issues if this happens.
Note that this method will only work with trial software that keeps track of your MAC address.

Change MAC Address on Windows

You can easily change your MAC address, although the only option available is to create your own personalized one (OS X allows you to randomize it).
Start by opening Device Manager, then go to "Network adapters," find the network you want to modify (which will say "Wireless" somewhere in the name), then right-click and select Properties.
Select "Network Address," click on "Value," and enter a 12-digit address made up of numbers and letters. When you're satisfied with it, click on OK to change your MAC address.

Change MAC Address on Mac

Before changing the MAC address, hold down on the Option key and click on the Wi-Fi icon in the menu bar to view your existing MAC Address and hardware Interface Name.
As you can see in the screenshot below, my MAC address is6c:40:08:8c:37:c4 and my interface name is en1 (it'll either be "en1" or "en0")—be sure to take note of your Interface Name, as it'll be used to determine how you change your MAC address.
Now you can change your MAC address one of two ways: either create your own personalized address, or allow OS X to give you a random one, using a Terminal command.
Open Terminal and enter one of the commands below, using the correct interface name (en0 or en1):
Personalized MAC Address:
  • sudo ifconfig en0 ether ##:##:##:##:##:##
Replace # with your choice of letters and number.
Random MAC Address:
  • openssl rand -hex 6 | sed 's/\(..\)/\1:/g; s/.$//' | xargs sudo ifconfig en0 ether
The first Terminal command for a personalized MAC address permanently changes your address, while the second command randomizes your address only during your session, meaning if you restart your computer, your original MAC address will return.

Changing Your MAC Address Can Give You Unlimited Internet

Certain Wi-Fi hotspots, like those at airports and coffee shops, provide an hour of free internet for you to use, using your MAC address for tracking, which ensures you only get that hour and nothing more.
By changing your MAC address, you can get countless hours of free hotspot sessions. While this may sound annoying, it does provide a reasonable method of getting free internet for a short period of time.

If You Enjoy a Product, Purchase It

Developers work hard to provide software for you to use to make your life easier. When you purchase their items, it not only provides a means of living for them, it helps them works on updates to make their app better, and to create more products that you might enjoy in the future.
By all means, use the methods above to test out software for as long as you need to, but also make sure that you don't abuse it. All I'm saying is that if you do truly appreciate someone's hard work, the least you can do is purchase it.
Viewing all 25 articles
Browse latest View live


Latest Images